Supplier settings
Find this screen
Open: Settings > Customers and Suppliers > Supplier Defaults and Settings
How to
Set defaults for your supplier accounts
Open: Settings > Customers and Suppliers > Supplier Defaults and Settings | Supplier Defaults
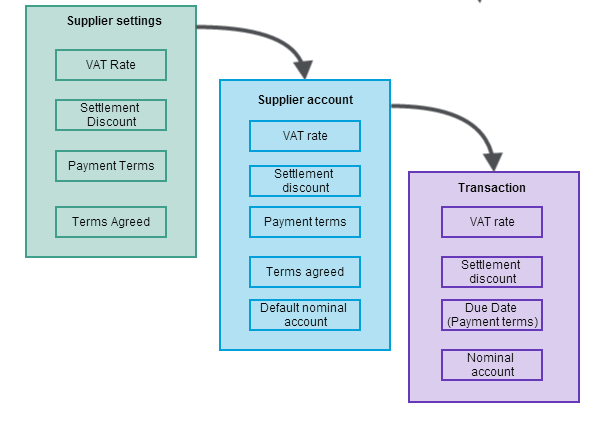
This is where you can enter default settings for your supplier accounts and purchase transactions.
Defaults entered here are passed on to each new supplier account. Defaults entered on supplier accounts are passed on to transactions.
The following diagram shows how this works.
Why set defaults?
Setting defaults can save you time when create accounts and also helps to prevent errors.
Any changes you make to these defaults are only used when you create a new account. Existing accounts and transactions are not affected.
If you want to apply the changes to your existing accounts, you'll need to update each account separately.
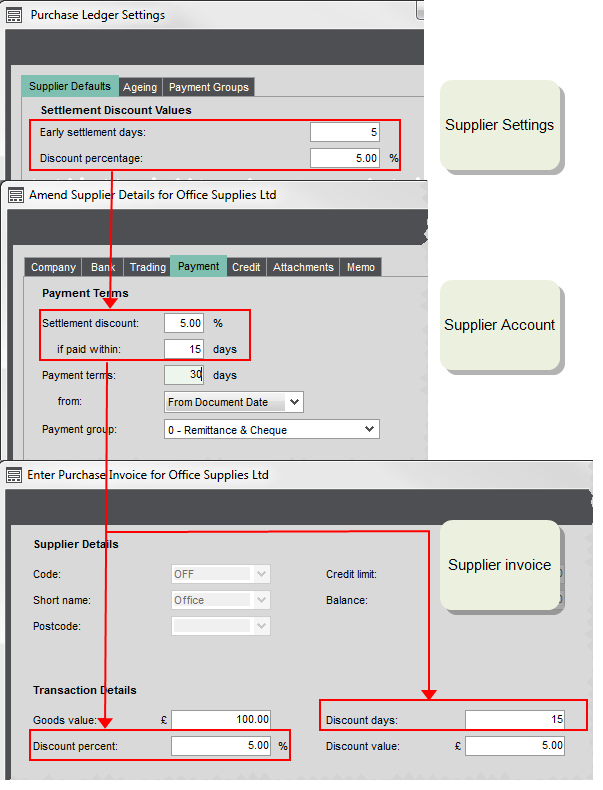
Set default settlement discount details
Open: Settings > Customers and Suppliers > Supplier Defaults and Settings | Supplier Defaults
If your
Early settlement days - the default number of days to qualify for the discount.
Discount percentage - the default settlement discount percentage.
If you don't want to set default settlement discount details, leave these options blank.
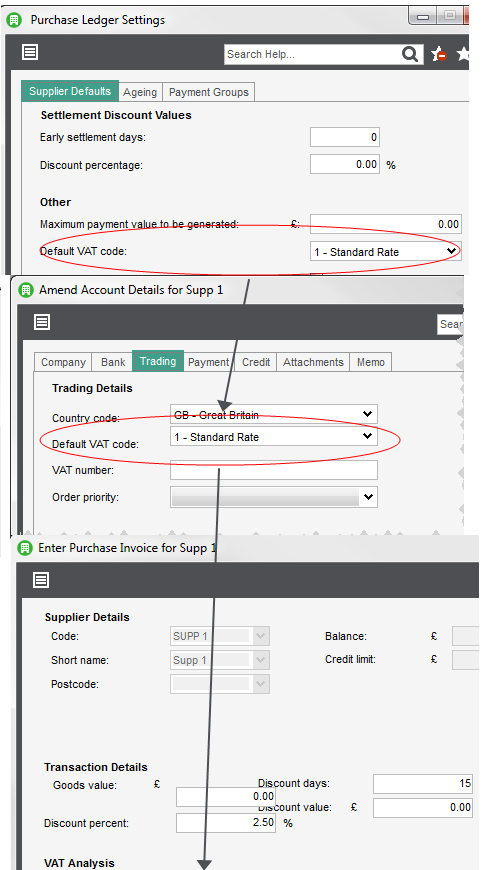
Set a default VAT rate
Open: Settings > Customers and Suppliers > Supplier Defaults and Settings | Supplier Defaults
This is the default VAT rate to be used on your accounts and then passed to your transactions.
If most of your transactions are going to use standard VAT, leave the standard VAT rate selected in the drop-down box.
If the majority of your
This helps you to make sure that the correct VAT rate is used when entering transactions.
For example, when you create an account for an EU
Set default terms agreed
Open: Settings > Customers and Suppliers > Supplier Defaults and Settings | Supplier Defaults
Select this if you want to agree terms on most of your new accounts. You can still change this on individual accounts if you need to.
Don't select this if you want to individually choose whether your
If the Terms Agreed box isn't selected on a
Set a maximum payment value
Open: Settings > Customers and Suppliers > Supplier Defaults and Settings | Supplier Defaults
Sage 200 has a process for automatically creating payments for your suppliers. This calculates the total value of invoices due to be paid and then creates a single payment for each supplier. This saves you having to work out how much you owe each supplier.
If you're using
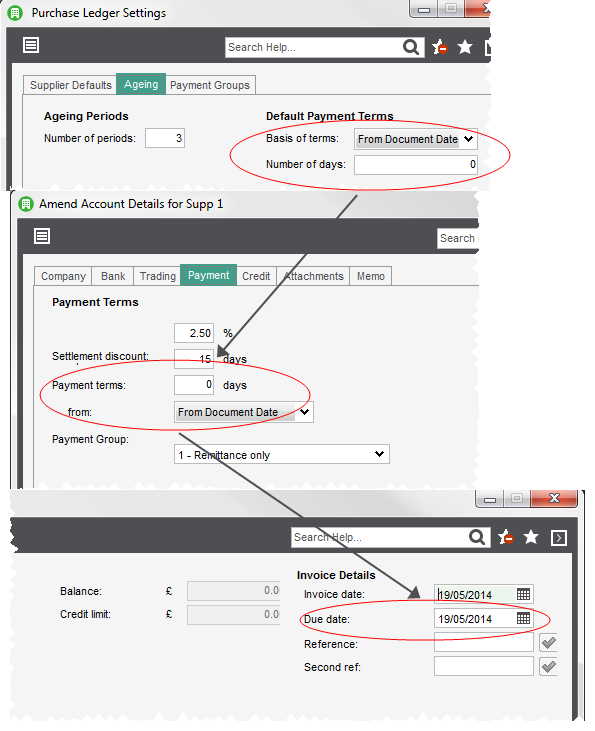
Set default payment terms
Open: Settings > Customers and Suppliers > Supplier Defaults and Settings | Supplier Defaults.
You can set default payment terms on the Ageing tab. These are passed on to your
The payment terms set on an account are used to calculate the Due date of an invoice.
If you try to agree the same payment terms with most of your
If you need to, you can change the payment terms on individual
To set your default payment terms:
-
Choose the Basis of terms. This is when the credit period starts from.
What the choices mean- Document date - the number of days after the transaction date.
- Start of month - the number of days after the first day of the month that the transaction is dated in.
- End of month - the number of days after the last day of the month that the transaction is dated in.
- Calendar monthly - the invoice is due on the same day in the following month.
- Enter the default Number of days. This is the number of days credit that
Default allocation date (suppliers)
You can choose the default allocation date recorded for
-
Use payment/receipt date: The allocation date for the transaction is set to the same date that you enter for the receipt or payment.
For example, if you enter a receipt dated 5 November, then allocate the receipt on 12 November, the allocation date for the transaction will be 5 November.
-
Use system date: The allocation date for the transaction is set to the date when you record the allocation in Sage 200.
For example, if you enter a receipt dated 5 November, then allocate the receipt on 12 November, the allocation date for the transaction will be 12 November.
The default allocation date will be applied when you use the following features:
-
Enter Supplier Receipt.
-
Enter Supplier Payment.
-
Generate Payments.
-
Amend Suggested Payments, for Pay Now.
-
Correct Transactions, for Correct and Reverse.
Set ageing periods
Open: Settings > Customers and Suppliers > Supplier Defaults and Settings | Ageing
Ageing periods are used to show how old your outstanding transactions are.
On the Ageing tab, you choose the number of ageing periods you want to use and the number of days in each period. Generally, debts are aged over 3 periods, which are typically 30, 60 and 90 days, so this is already set up for you.
You can have from 3 to 8 periods of any length (in days). The last period shows any debts for that period or older.
- Enter the Number of periods your want to use.
- In the
Transactions are aged from their transaction date and not their due date.
These ageing periods are used on
The next time you run the aged creditor report, your aged balances will show in the new periods.
Set due date periods
Open: Settings > Customers and Suppliers > Supplier Defaults and Settings | Ageing
Due date periods are used on the Due Date report .
The Due Date report shows the total amount owed
Your due date periods are automatically set to be the same as your ageing periods but you can change them if you want to.
To change the due date periods:
- In the Due date periods start after grid, enter the length of each due date period (in days).
Set up authorisation for invoices and credit notes
Open: Settings > Customers and Suppliers > Supplier Defaults and Settings | Processing.
If you require purchase invoices or credit notes above a certain value to be authorised before they can be processed, you can set up purchase invoice authorisation.
- Select Use Authorisation to enable purchase invoice authorisation.
-
Enter the authorisation amount in the Require authorisation for amounts exceeding box.
-
All invoices or credit notes with a value greater than this amount must be authorised.
When you create an invoice or credit note, the Requires authorisation option will be selected and cannot be changed.
Tip: To authorise an invoice, open Suppliers > Enter transactions > Authorisation.
-
All invoices or credit notes below this amount are set to require authorisation by default, but you can change this if they don't require authorisation.
When you create an invoice or credit note, the Requires authorisation option will be selected, but you can deselect it if required.
- To require all your invoices to be authorised, do not specify an amount here and leave it as zero.
-
Note: This applies to purchase invoices and credit notes that you enter as a single item or as part of a batch.
Note: In addition to authorising purchase invoices, you can also set up authorisation for purchase orders. If you want to authorisation for purchase orders too, see Purchase order authorisation.
-
You can't allocate a payment to the invoice until it's authorised.
- You can't allocate an unauthorised credit note to an invoice.
- You can't reverse an unauthorised invoice or credit note.
- Transactions that have not been authorised are assigned an unauthorised query flag (U). You can see this flag on the Supplier Transaction Enquiry.
- Invoices or credit notes that require authorisation are posted to the default nominal account for Unauthorised Purchases. Make sure that you select a default nominal account for Unauthorised Purchases, otherwise postings will be made to the Suspense Account.
- When you authorise the transactions, the original postings (to Unauthorised Purchases) are automatically reversed. You can then apply your usual nominal analysis.
- When you first enable Use Authorisation, the authorisation settings will only apply to new purchase invoices and credit notes, and not existing documents.
- If you disable Use Authorisation while there are invoices still waiting to be authorised, you will not be able to authorise these as the Authorisation menu option will not be enabled (Suppliers > Enter transactions > Authorisation).
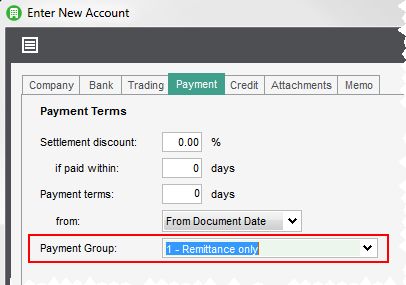
Set up payment groups
Open: Settings > Customers and Suppliers > Supplier Defaults and Settings | Payment Groups
A payment group for each payment method is set up for you up by default.
You can change the description to make the payment group more relevant to your business.
Useful info
More about payment terms and due dates
This is the length of time you're allowed before payment of your invoice is due. Most businesses will allow a period of credit before invoices are due to be paid. You'll usually make these arrangements with each supplier as different businesses have different requirements.
In Sage 200, you record these Payment terms on each supplier account. This is then used to calculate the Due date of your invoices. This helps you to see when you need to pay your suppliers and helps to manage your cash flow.
If you have the same payment terms for the majority of your suppliers, you can set this a default here. This is then passed on to your supplier accounts when they're created.
When you enter your payment terms you choose the number of days credit that you've agreed and when this credit period starts from. These are outlined below:
Invoices are due the specified number of days after the invoice date.
For example, if the Number of days is set to 15 and you enter an invoice with an invoice date of 03/10, the due date for the invoice will be 18/10.
Invoices are due the specified number of days after the start of the month in which an invoice is dated.
For example. if the Number of days is set to 30 and you enter an invoice with an invoice date of 03/10, the due date for the invoice will be 31/10.
Invoices are due the specified number of days after the end of the month in which the invoice was dated.
For example, if the Number of days is set to 15, and you enter an invoice with an invoice date of 03/10, the due date for the invoice will be 15/11.
Invoices are due on the same day the following month. The Number of days is automatically set to 0.
For example, if you enter an invoice with an invoice date of 03/10, the due date will be 03/11.
Due date calculations are only made for invoice transactions. Credit notes always retain the same due date as the entered transaction date.
More about payment groups
Sage 200 has a process for automatically creating payments for your suppliers. This calculates the total value of invoices due to be paid and then creates a single payment for each supplier. This saves you having to work out how much you owe each supplier.
Payment groups tell Sage 200 how to process these payments for each supplier, such as whether to print a cheque and/or remittance advice, pay via e-banking, or pay via Supplier Payments.
How to set up payment groups and add them to supplier accounts
- Set up payment groups
- Enter a maximum payment value (on the Details tab) if you want to set an upper limit for the amount you pay a single supplier in one go.
-
Decide how you want to pay the supplier by assigning a payment group to the supplier's account.
|
Remittance and cheque |
Prints a remittance and cheque. |
|
Remittance only |
Prints a remittance only. |
|
Cheque only |
Prints a cheque only. |
|
Email Remittance |
Emails the remittance. |
|
Epayment |
Pays the supplier via e-Banking A service provided by Sage and your bank to allow you to pay suppliers, pay your VAT and automatically reconcile your bank account.. |
|
Epayment Remittance |
Pays the supplier via e-Banking and prints a remittance. |
|
Epayment Email Remittance |
Pays the supplier via e-Banking and emails the remittance. |
|
Supplier Payments |
Pays the supplier using a Supplier Payments account. |
| Supplier Payments and Remittance | Pays the supplier using a Supplier Payments account. |
About authorising purchase invoices
You can use authorisation for supplier invoices and credit notes that are entered directly to the Purchase Ledger (and not from a purchase order).
Note: This is separate to the authorisation process available for your purchase orders.
You can set up authorisation to be automatically selected if the purchase invoice or credit notes is above a specified value.
For all other invoices or credit notes below this value, you can choose whether they requires authorisation by selecting Requires Authorisation when the transaction is entered.
When you create an invoice or credit note that requires authorisation:
- The transaction is assigned an unauthorised query flag (U).
- The transaction is posted to the default nominal account for Unauthorised Purchases. If an Unauthorised purchases default nominal account is not specified, the invoice value is posted to the Suspense Account.
Once the transactions are authorised:
- The unauthorised query flag (U) is removed from the transaction.
-
The nominal expense account (for profit and loss) is debited with the goods value according to the nominal analysis, and a corresponding credit value is posted to the default nominal account for Unauthorised Purchases (for the balance sheet).